Freeradius With Okta Ldap (assign VLAN with OKTA attributes)
0. 개요
802.1x 프로젝트의 목표는 네트워크 인증시 조직정보를 기반으로 지정된 IP pool 을 할당해주는 것입니다.
이를 위해서 radius 서버가 할 일은
- 인증 시 AD, okta 등에서 조직정보를 가져와 확인하고
- 해당 정보를 기반으로 vlan 변경에 필요한 radius attribute 를 스위치에 전달하는 것
입니다.
radius 가 AD 에 대한 유저정보를 가져오기 위해선 LDAP 프로토콜을 사용하여야 합니다.
옥타도 LDAP interface 를 지원하므로, 옥타 LDAP 을 통해 radius 가 직접 유저정보를 가져오고,
인증을 LDAP 에 위임함으로써 옥타 비밀번호를 통해 인증할 수 있습니다. (AD 불필요)
본 문서는 Freeradius 를 통해 인증 시 옥타 LDAP 으로 인증을 대신하고,
유저정보를 통해 VLAN 을 할당하는 방법에 대해 기술한 문서입니다.
1. 배경지식
1-0. 전제
Okta Radius Agent and Authentication Protocols (AAA)
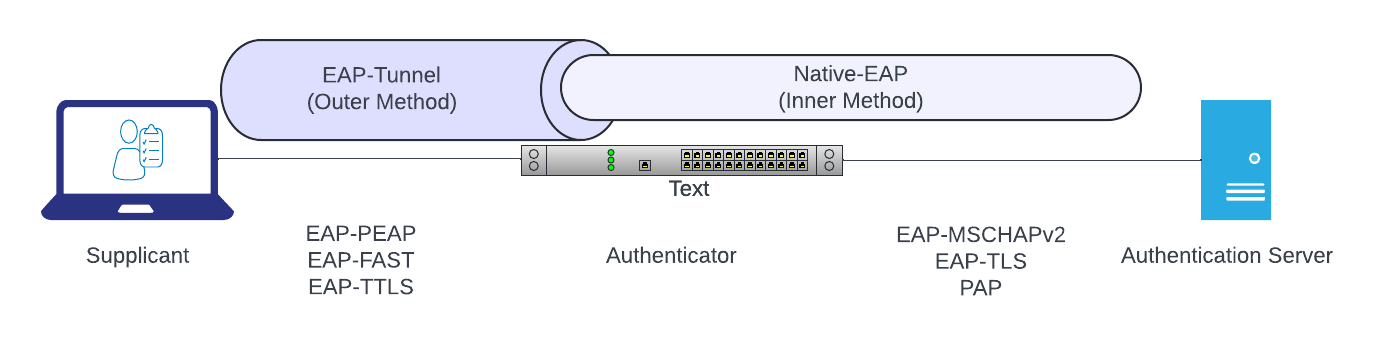
- supplicant : 사용자 기기, Authenticator : 스위치 , Authenticaion Server : Radius server
이전의 테스트를 통해, Radius Server 가 보내는 응닶값(Access-Accept 패킷) 중
Tunnel-Type = VLAN,
Tunnel-Medium-Type = IEEE-802,
Tunnel-Private-Group-ID = "17"
이 포함되면, Tunnel-Private-Group-ID 값 대로 switch 가
supplicant 요청포트의 VLAN 을 변경함을 확인하였습니다.
1-1. OKTA LDAP Interface
What Is LDAP & How Does It Work? | OKTA
OKTA LDAP Interface 는 Organization 당 하나만 활성화할 수 있습니다.

옥타에서 테스트유저 test@test.com 를 생성하고,
다음과 같이 ldapsearch cli 로 uid 를 기반으로 질의를 하면
$ ldapsearch -H ldaps://{your_domain}.ldap.okta.com:636 \
-D "uid=freeradius@test.com,ou=users,dc=cio-sso,dc=okta,dc=com" \
-W -v -b dc={your_domain},dc=okta,dc=com uid="test@test.com"
ldap_initialize( ldaps://{your_domain}.ldap.okta.com:636/??base )
Enter LDAP Password:
filter: uid=test@test.com
requesting: All userApplication attributes
# extended LDIF
#
# LDAPv3
# base <dc=cio-sso,dc=okta,dc=com> with scope subtree
# filter: uid=test@test.com
# requesting: ALL
#

# test@test.com, users, cio-sso.okta.com
dn: uid=test@test.com,ou=users,dc=cio-sso,dc=okta,dc=com
objectClass: top
objectClass: person
objectClass: organizationalPerson
objectClass: inetOrgPerson
uid: test@test.com
uniqueIdentifier: 00uoyjiu7vq6NCf8h697
organizationalStatus: ACTIVE
givenName: test
sn: test
cn: test test
mail: test@test.com
division: test_div
displayName: test
o: test_org
title: Crew
department: test_department

# search result
search: 2
result: 0 Success

# numResponses: 2
# numEntries: 1
User profile 정보를 불러올 수 있음을 알 수 있습니다. 테스트에서는 division attribute 를 vlan 할당에 사용해 보겠습니다.
FYI :
- 질의는 okta read only admin 이상 권한자만 가능합니다.
- password 입력시,
{password},push{password},{6자리 otp}를 넣어 mfa 를 수행할 수 있습니다.
2. FreeRadius 설정
2-0. FreeRadius LDAP 설정 - PAP
ldap 모듈은 radius 인증에 여러 방식을 지원하지만, 옥타 LDAP Interface 는 User-Password 를 주지 않으므로,
Supplicant 에게서 PW 를 제공받아 Ldap 에 인증을 위임(ldap bind as user)하는 PAP 방식을 사용하여야 합니다.
이때 Radius Server 는 유저와 PW 정보를 저장하지 않습니다.
로컬 맥에서 freeradius 를 올리고, radclient 를 통해 PAP 인증을 테스트해봅시다.
## 설치
$ brew install freeradius-server
$ cd /opt/homebrew/Cellar/freeradius-server/3.2.7/etc/raddb/

## ldap module 활성화
$ cd mods-enabled; ln -s ../mods-available/ldap
mods-available/ldap 설정파일 :
ldap {
    # okta ldap interface, 질의 수행할 ldap 유저 정보,
    # 해당 유저는 패스워드만으로 로그인 가능해야 함
+	server = 'ldaps://{your_domain}.ldap.okta.com'
+	identity = 'uid=freeradius@test.com,ou=users,dc=cio-sso,dc=okta,dc=com'
+	password = Test123!@#

+	base_dn = 'dc=cio-sso, dc=okta, dc=com'

	sasl { # 필요없음
	}

    # 해당 구문을 통해 LDAP Attribute 를 Radius Attribute 에 매핑할 수 있습니다.
    # 구문순서 : <radius attr> <op (=, :=, +=, -=)> <ldap attr>
    # Radius Attribute list : https://www.iana.org/assignments/radius-types/radius-types.xhtml
+	update {
+		# Reply-Message 에 division 정보를 추가합니다. (위 예시의 값은 Platform)
+		reply:Reply-Message := 'division'
+	}


    # 여기서부터는 기존파일 변경필요 X
	user_dn = "LDAP-UserDn"

	user {
		base_dn = "${..base_dn}"
        # 해당 필터 기반으로 ldap 에서 유저를 검색합니다.
        # uid=Stripped-User-Name 존재시 Stripped-User-Name, 없을시 User-Name
		filter = "(uid=%{%{Stripped-User-Name}:-%{User-Name}})"

		sasl {
		}
	}
...
sites-available/default 설정파일 :
authorize {
...
-# -ldap
+ -ldap
	#  ldap bind user 로 옥타를 통해 인증하기 위해 다음을 추가합니다
	#  If you're using Active Directory and PAP, then uncomment
	#  the following lines, and the "Auth-Type LDAP" section below.
	#
	#  This will let you do PAP authentication to AD.
	#
-	#if ((ok || updated) && User-Password && !control:Auth-Type) {
-	#	update control {
-	#		&Auth-Type := ldap
-	#	}
-	#}
+	if ((ok || updated) && User-Password && !control:Auth-Type) {
+		update control {
+			&Auth-Type := ldap
+		}
+	}
...

#  Post-Authentication
#  Once we KNOW that the user has been authenticated, there are
#  additional steps we can take.
post-auth {
+ # 인증성공시, Reply-Message 를 기반으로 VLAN 할당에 필요한 Attribute 을 추가합니다
+ if (reply:Reply-Message == "test_div") {
+     update reply {
+         Tunnel-Type := "VLAN"
+         Tunnel-Medium-Type := "IEEE-802"
+         Tunnel-Private-Group-ID := "17"
+     }
+ }

...
✅ radclient 를 통한 테스트
$ radiusd -X : 라디우스 서버 디버그모드 실행


# radclient [options] server[:port] <command> [<secret>]
#시크릿은 테스트용, raddb/clients.conf client 안에 secret 명시가능
$ radclient -f test -t 20 127.0.0.1:1812 auth testing123

-----
test 파일(supplicant 의 Auth-Request) :
User-Name=test@test.com
User-Password="QWEqwe123@"

User-Password="testPassword,push" 쓰면 okta verify push mfa 도 가능함
결과 :

- devision attr 에 따라
Tunnel-Private-Group-Id할당 성공
2-1. FreeRadius LDAP 설정 - EAP-TTLS
맥은 raw PAP 방식을 지원하지 않으므로, EAP-TTLS 로 PAP 요청을 감싸야 합니다.
필요 추가설정 :
EAP-TTLS 는 인증을 수행할 supplicant 에 Radius 서버의 Root CA certificate 이 필요합니다.
freeradius/certs/README.md :
The `openssl` command will be run against the sample configuration files included here, and will make a self-signed certificate authority (i.e. root CA), and a server certificate. This "root CA" should be installed on any client machine needing to do EAP-TLS, PEAP, or EAP-TTLS.라디우스 서버에서 LDAP으로의 실제 인증시도는 EAP-TTLS 의 inner tunnel (PAP) 에서 이루어지기 때문에,
sites-available/default가 아니라sites-available/inner-tunnel에서
post-auth 를 수행하여야 합니다.
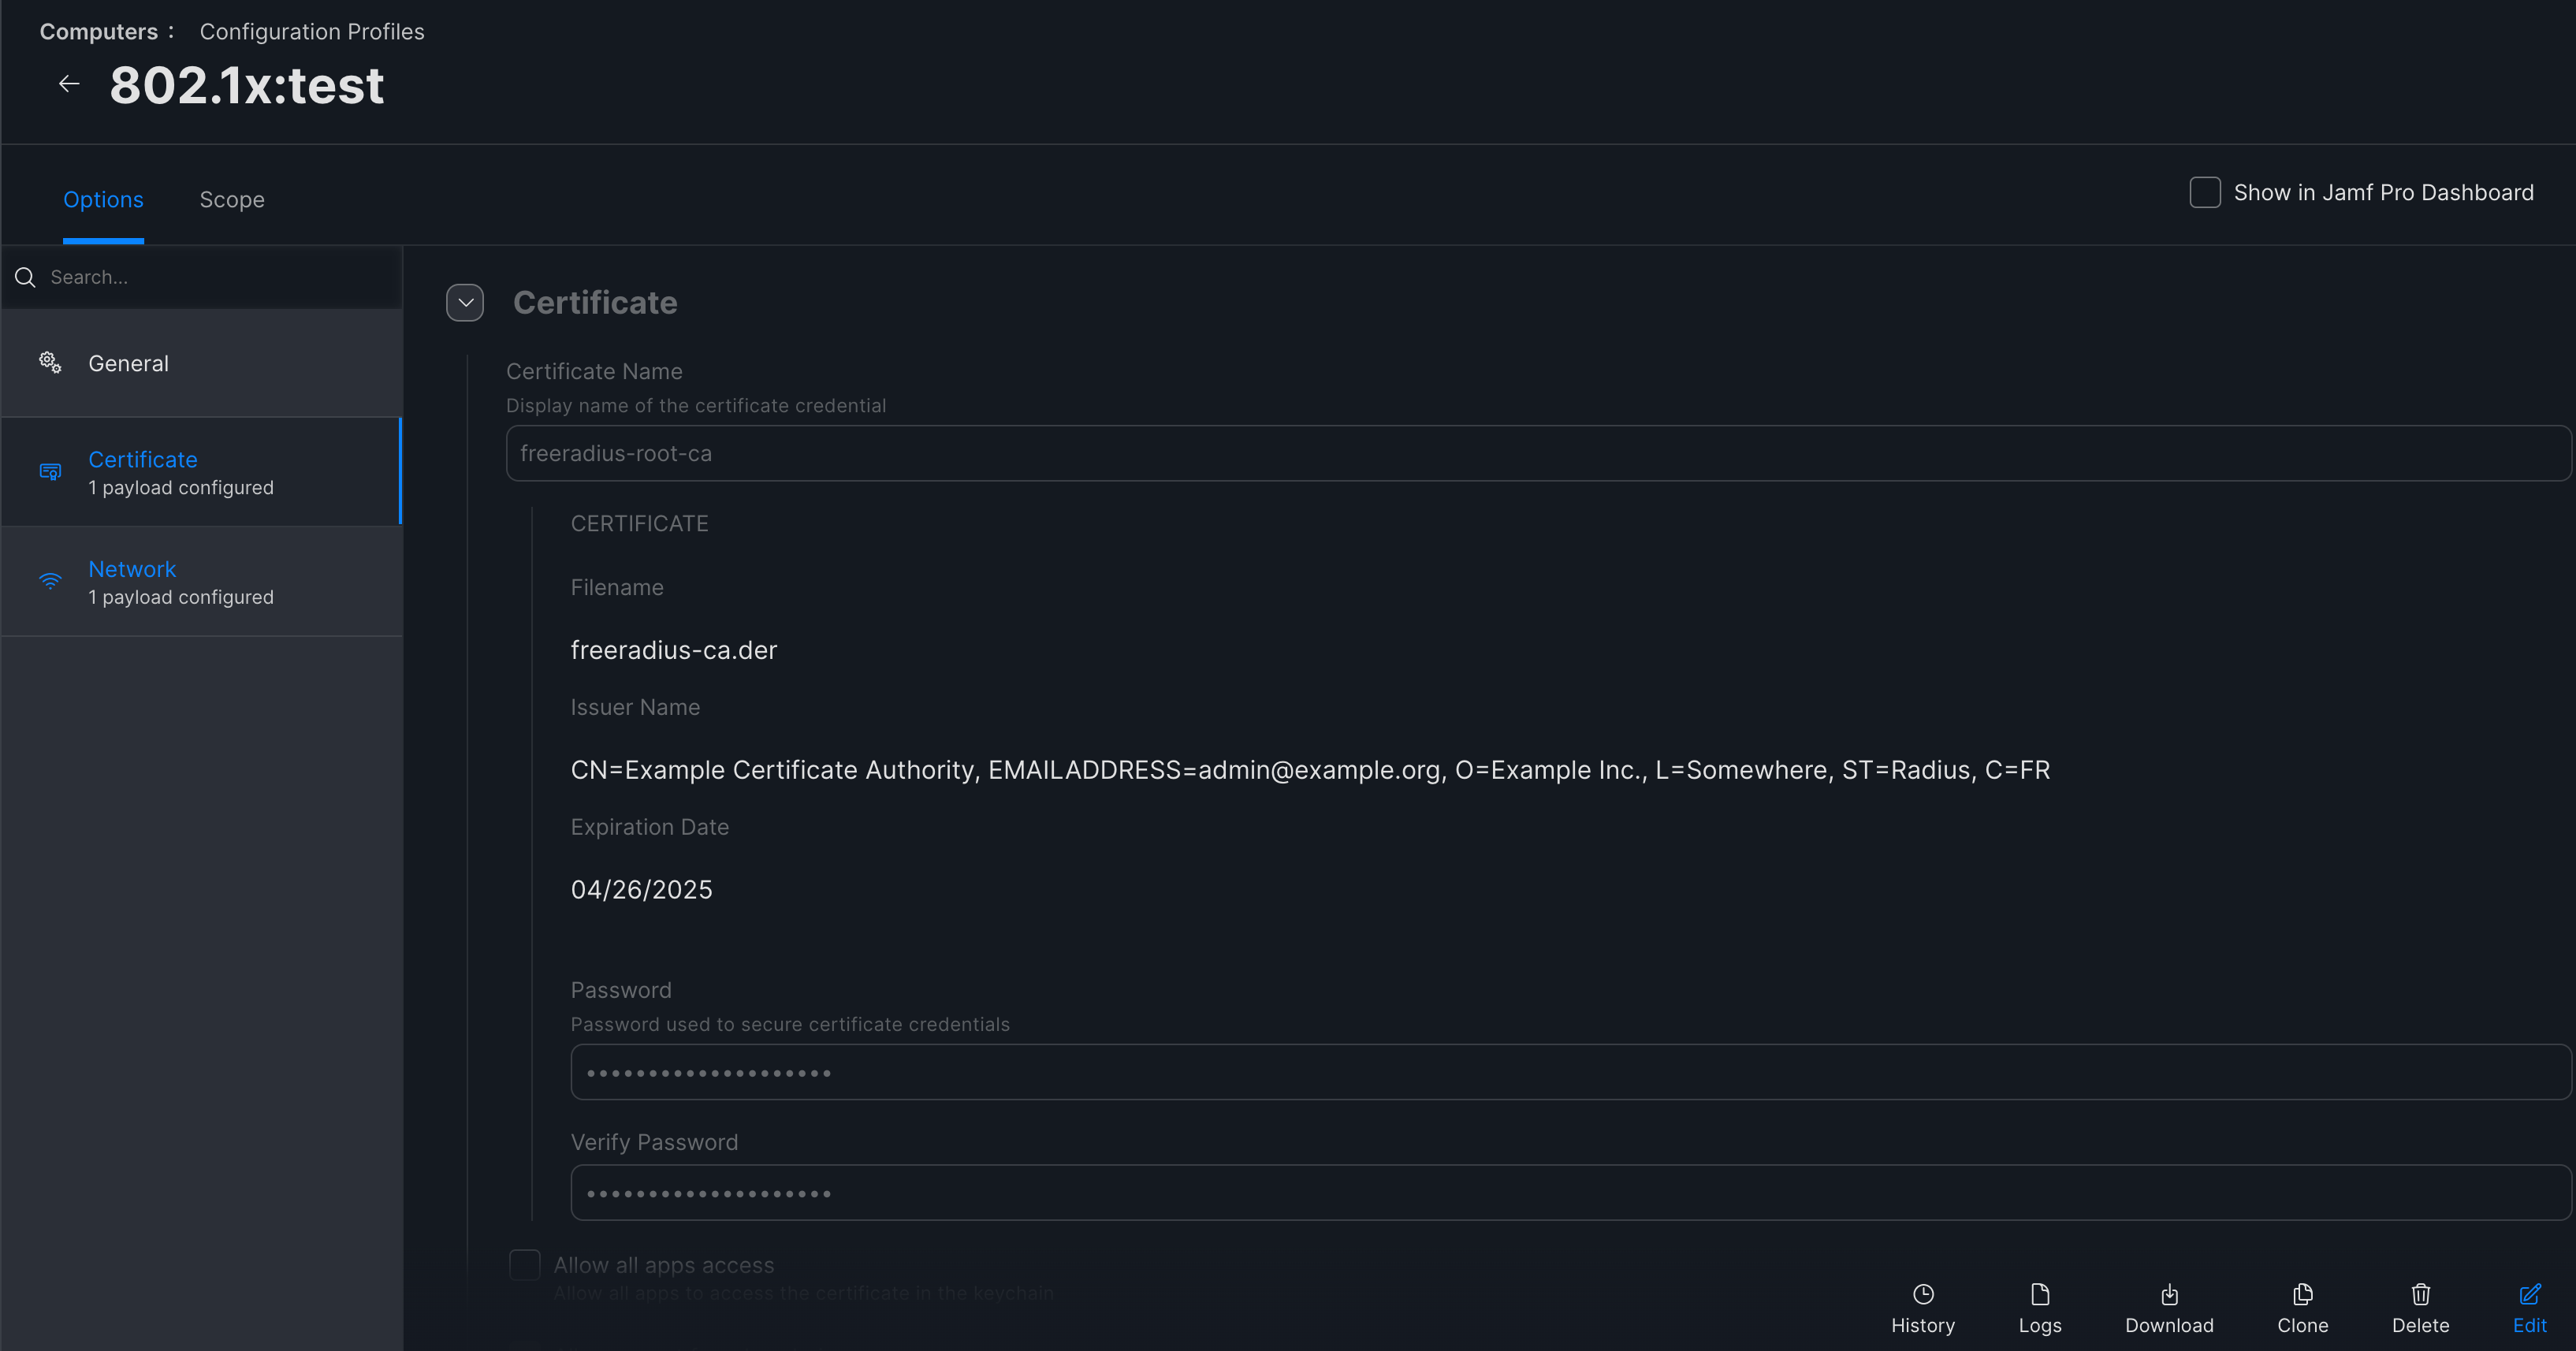
Jamf Profile (for cert) :
테스트 supplicant 로 맥을 사용하기 때문에,
맥에 802.1x Configuration Profile 을 배포하기 위해 jamf 를 사용합니다.
freeradius 의 CA 인증서는 /etc/freeradius/certs/ca.* 에 있습니다.
ca.cnf : ca 비밀번호 확인
[ req ]
prompt			= no
distinguished_name	= certificate_authority
default_bits		= 2048
input_password		= whatever
output_password		= whatever
x509_extensions		= v3_ca
jamf configuration profile 생성, certificates 에 /etc/freeradius/certs/ca.der 를 추가하고,
비밀번호를 ca.cnf 의 값대로 설정합니다.
Network 에서 802.1x 인증시 사용할 프로토콜을 EAP-TTLS, Inner Authentication 은 PAP로 설정합니다.
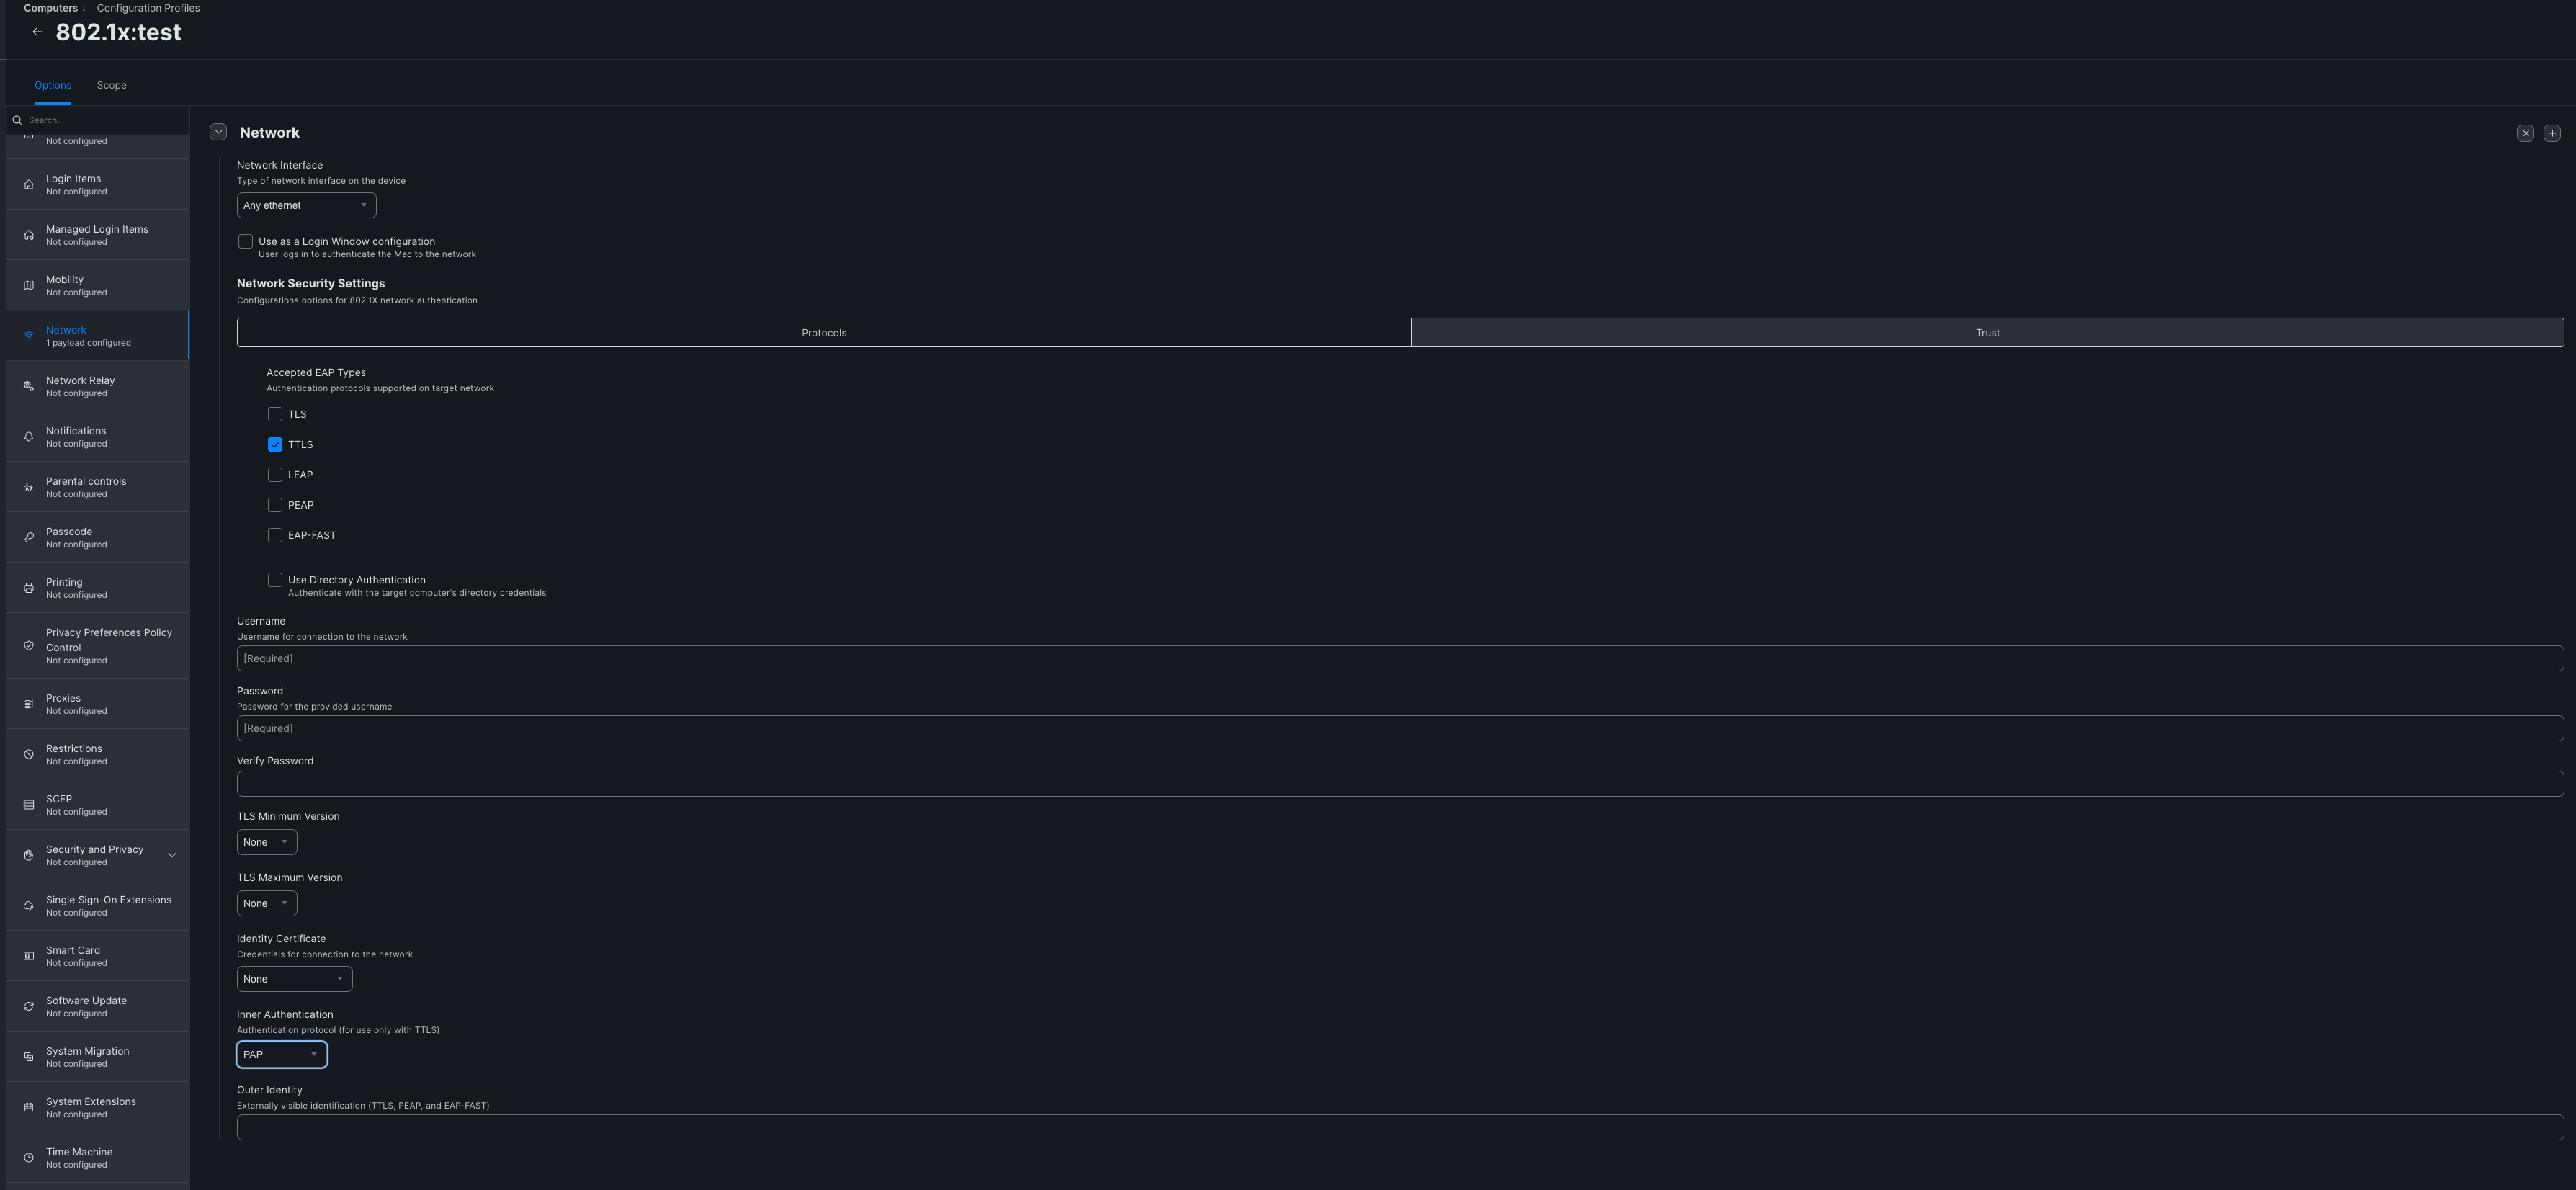
이후 scope 를 테스트 기기로 하여 configuration profile 을 배포합니다.
sites-available/default 설정파일 :
...

#  Post-Authentication
#  Once we KNOW that the user has been authenticated, there are
#  additional steps we can take.
post-auth {
  # 인증성공시, Reply-Message 를 기반으로 VLAN 할당에 필요한 Attribute 을 추가합니다
- if (reply:Reply-Message == "test_div") {
-     update reply {
-         Tunnel-Type := "VLAN"
-         Tunnel-Medium-Type := "IEEE-802"
-         Tunnel-Private-Group-ID := "17"
-     }
- }

...
1-1 번 테스트에서 추가한 부분을 삭제합니다.
sites-available/inner-tunnel 설정파일 :
authorize {
...
-# -ldap
+ -ldap
	#  ldap bind user 로 옥타를 통해 인증하기 위해 다음을 추가합니다
	#  If you're using Active Directory and PAP, then uncomment
	#  the following lines, and the "Auth-Type LDAP" section below.
	#
	#  This will let you do PAP authentication to AD.
	#
-	#if ((ok || updated) && User-Password && !control:Auth-Type) {
-	#	update control {
-	#		&Auth-Type := ldap
-	#	}
-	#}
+	if ((ok || updated) && User-Password && !control:Auth-Type) {
+		update control {
+			&Auth-Type := ldap
+		}
+	}
...

#  Post-Authentication
#  Once we KNOW that the user has been authenticated, there are
#  additional steps we can take.
post-auth {
+ # 인증성공시, Reply-Message 를 기반으로 VLAN 할당에 필요한 Attribute 을 추가합니다
+ if (reply:Reply-Message == "test_div") {
+     update reply {
+         Tunnel-Type := "VLAN"
+         Tunnel-Medium-Type := "IEEE-802"
+         Tunnel-Private-Group-ID := "17"
+     }
+ }

	######  중요! inner-tunnel 의 reply 를 outer 로 업데이트하여,
    ######  최종적으로 supplicant 에 전달하기 위해 다음이 반드시 필요합니다.
	#  Instead of "use_tunneled_reply", change this "if (0)" to an
	#  "if (1)".
	#
-	if (0) {
+	if (1) {
		#
		#  These attributes are for the inner-tunnel only,
		#  and MUST NOT be copied to the outer reply.
		#
		update reply {
			User-Name !* ANY
			Message-Authenticator !* ANY
			EAP-Message !* ANY
			Proxy-State !* ANY
			MS-MPPE-Encryption-Types !* ANY
			MS-MPPE-Encryption-Policy !* ANY
			MS-MPPE-Send-Key !* ANY
			MS-MPPE-Recv-Key !* ANY
		}

		#
		#  Copy the inner reply attributes to the outer
		#  session-state list.  The post-auth policy will take
		#  care of copying the outer session-state list to the
		#  outer reply.
		#
		update {
			&outer.session-state: += &reply:
		}
	}

...
✅ Mac Supplicant 에서의 테스트
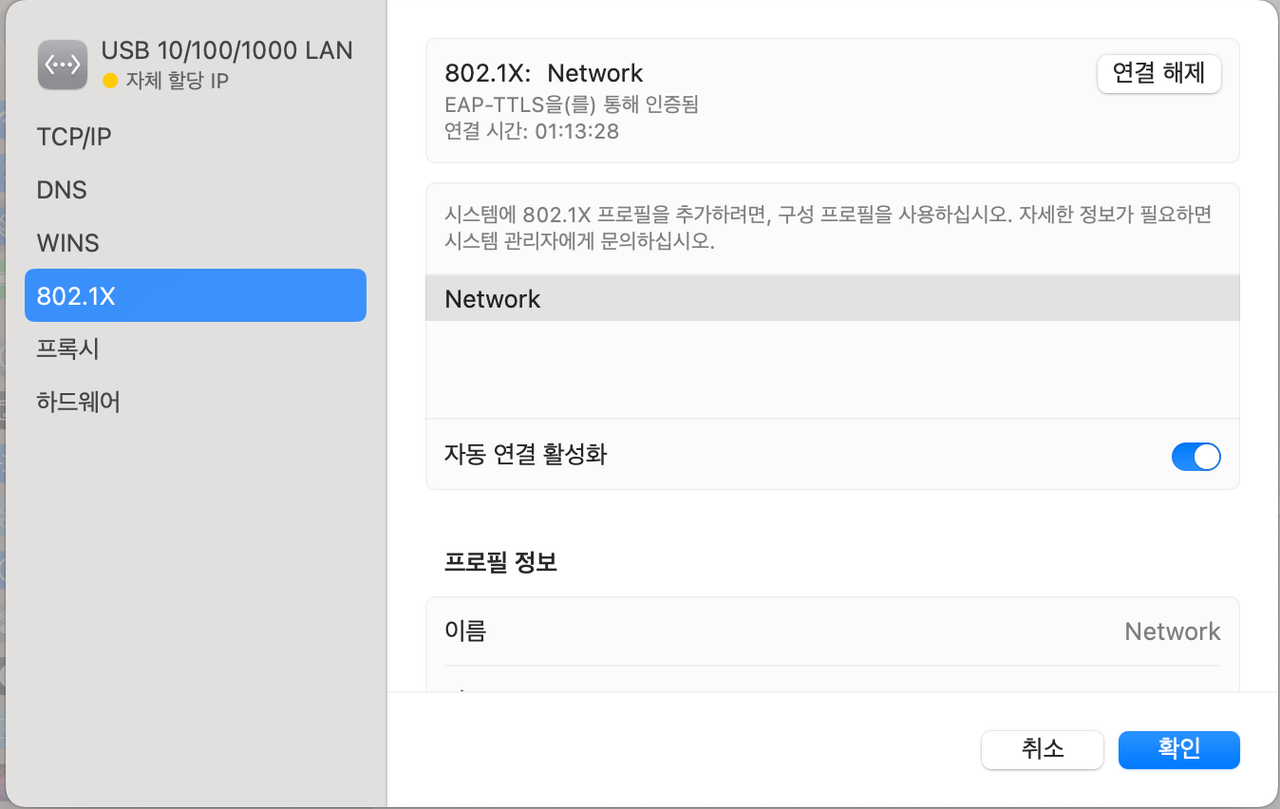
- OKTA 테스트 계정 test@test.com 으로 인증을 수행 성공
FreeRadius Log

- post-auth if문 대로 VLAN 변경에 필요한 attribute 이 전달됨
스위치에서 VLAN 변경 확인
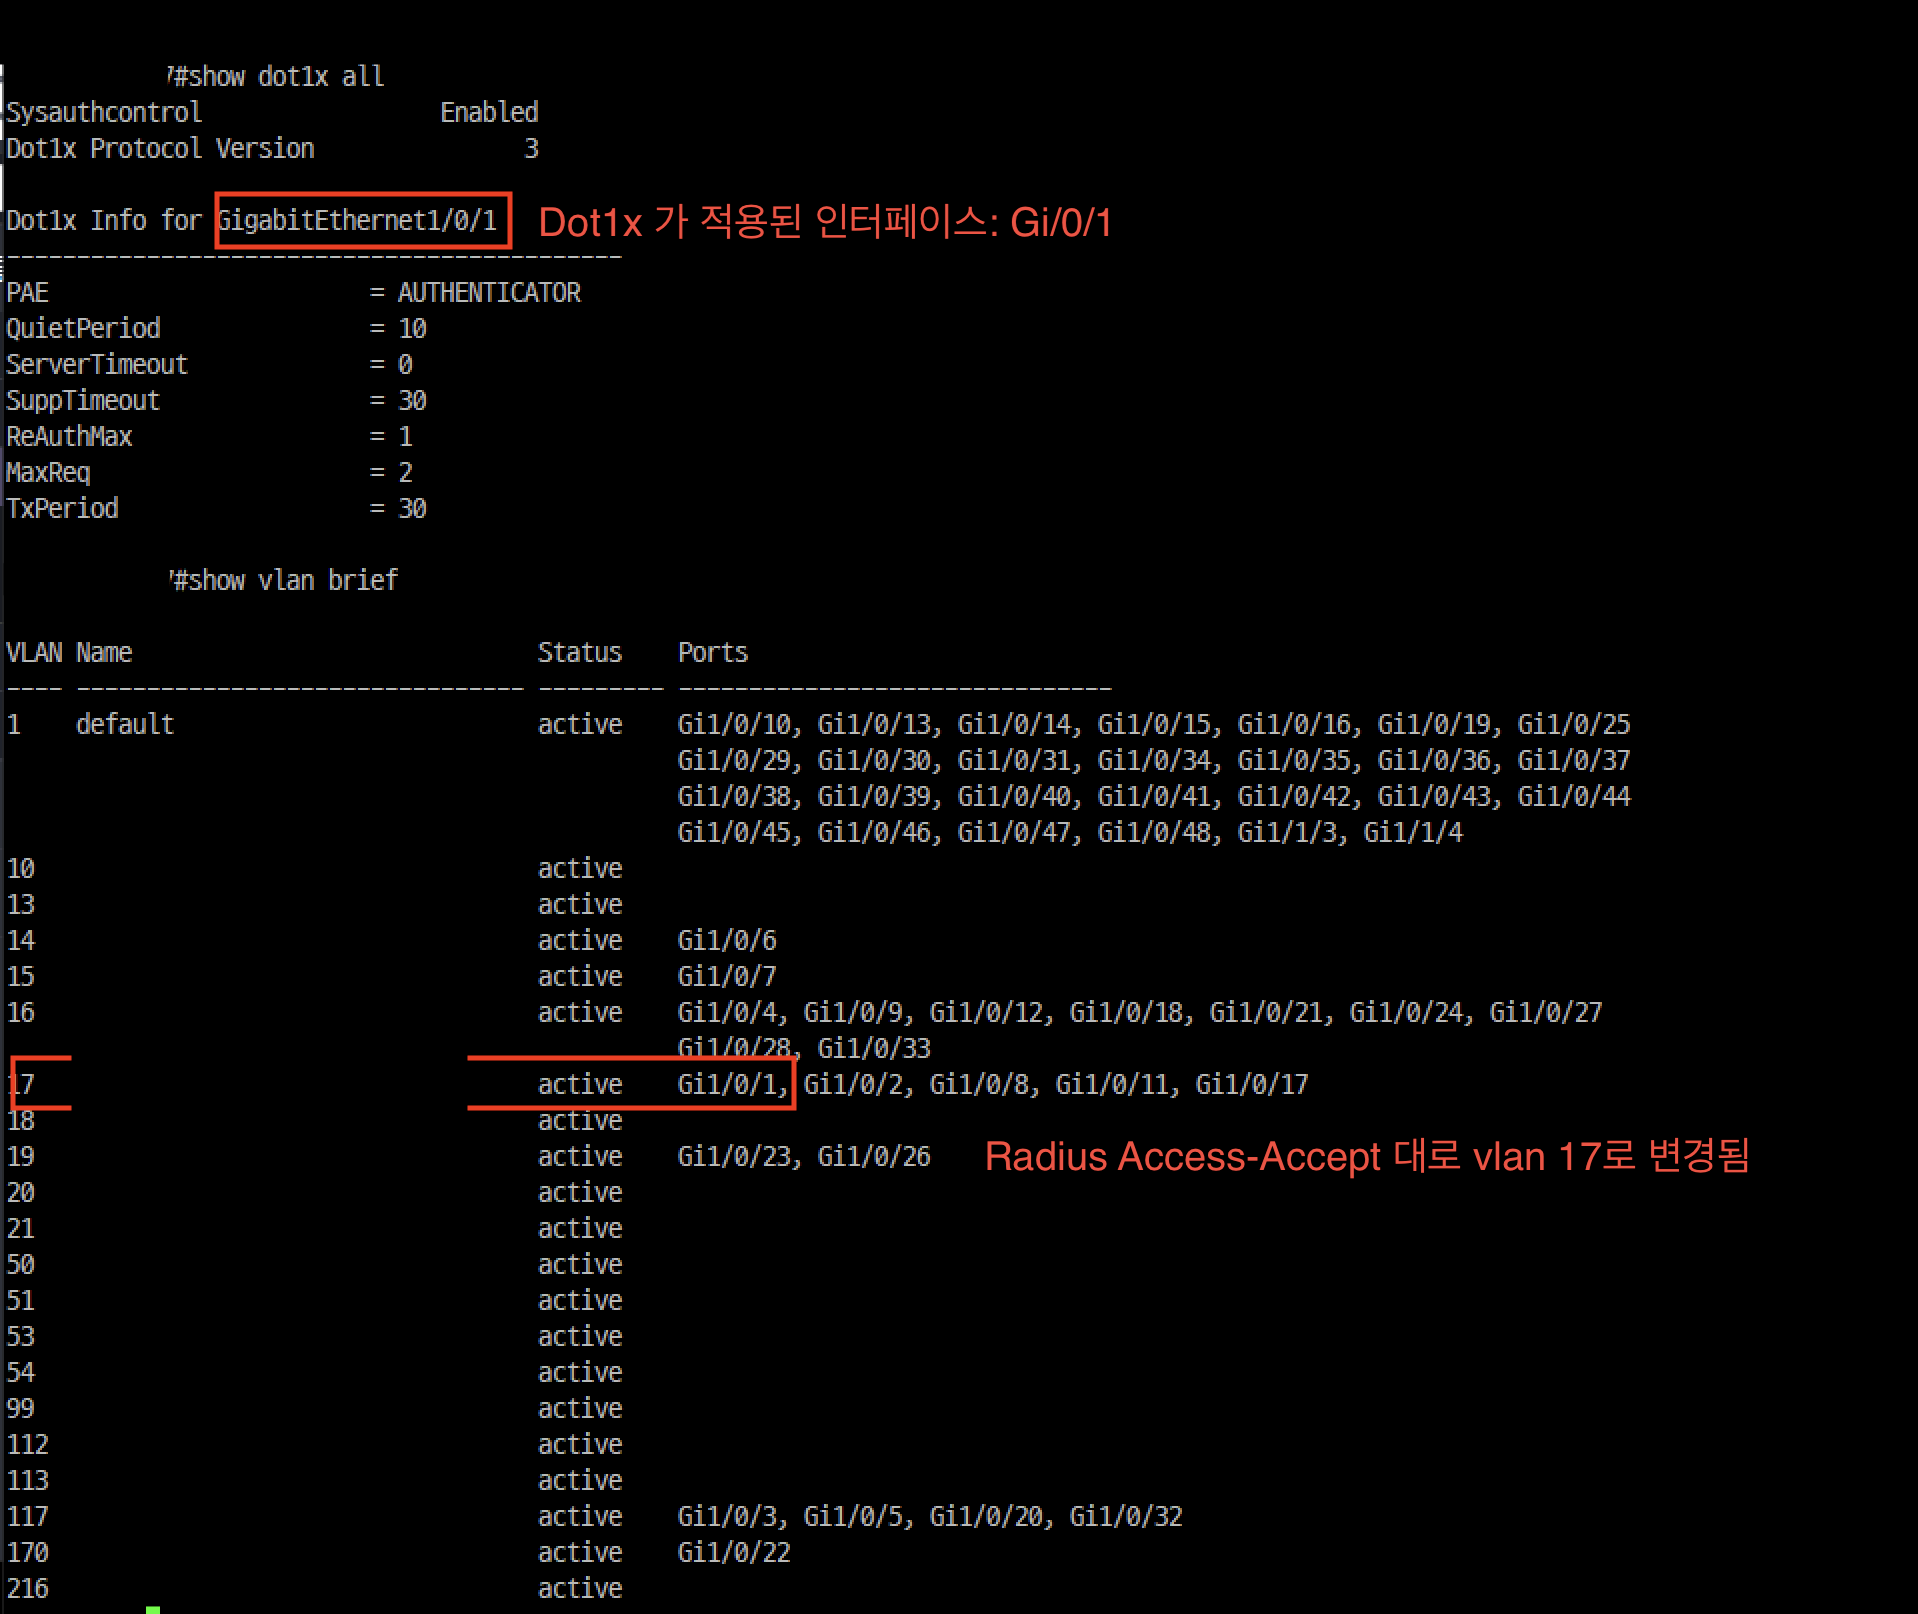 해당 인터페이스의 vlan 이 17로 성공적으로 변경되었음을 알 수 있습니다~!